本文介绍如何将HTML代码转换成图片,网上有几种常见的方法,下面先来介绍一下。
一、 几种办法
1. Java
使用下面的依赖完成。
<dependency>
    <groupId>gui.ava</groupId>
    <artifactId>html2image</artifactId>
    <version>0.9</version>
</dependency>
可以参考https://www.cnblogs.com/nsw2018/p/16384419.html
缺点:无法获取HTML中的样式
2. API
使用https://docs.htmlcsstoimage.com/example-code/python这个网站的API来完成,每个月能免费生成50张图片,之后要收费。
缺点:贵。
3. wkhtmltopdf
我使用Java测试过,可以进行输入一个网站URL,得到网站截图。
但是我想要的是通过HTML代码,获取出图片,也就是这段HTML代码可能不运行在服务器上,访问不到,也就无法截图。
4. Puppeteer
符合我的需求。我可以编写一段JS脚本,Java发起请求,携带HTML代码,Node.js将图片返回给Java服务器。
二、步骤
- 服务器安装环境
- 服务器运行脚本
- Java发起请求
- 得到结果
三、服务器安装环境
以Ubuntu22.04为例
1. 安装Node和NPM
puppeteer-core 需要 Node.js 环境,所以你首先需要在 Ubuntu 上安装 Node.js。
可以通过以下命令来安装 Node.js 和 npm:
# 更新软件包列表
sudo apt update

# 安装 Node.js 和 npm
sudo apt install nodejs npm
验证安装是否成功:
node -v
npm -v
可能遇到的问题:
- 安装失败 解决:更换镜像源,阿里的我经常测试可以安装
- 安装Node版本太低,一般需要至少14以上 解决:使用
n管理工具更新 Node.js
使用阿里云镜像源
编辑 /etc/apt/sources.list 文件:
sudo vim /etc/apt/sources.list
将内容替换为以下内容(先备份原内容):
deb http://mirrors.aliyun.com/ubuntu/ jammy main restricted universe multiverse
deb http://mirrors.aliyun.com/ubuntu/ jammy-updates main restricted universe multiverse
deb http://mirrors.aliyun.com/ubuntu/ jammy-backports main restricted universe multiverse
deb http://mirrors.aliyun.com/ubuntu/ jammy-security main restricted universe multiverse
保存文件并退出编辑器,然后运行以下命令更新并重新安装:
sudo apt-get update
使用 n 管理工具更新 Node.js
首先安装 n 工具,然后使用它安装较新的 Node.js 版本。
sudo npm install -g n
sudo n stable
安装完成后,检查 Node.js 版本是否更新成功:
node -v
2. 安装 Puppeteer 和 Chrome 浏览器
puppeteer-core 是 Puppeteer 的一个精简版本,不包括 Chromium。你需要手动安装 Chromium 或指定已经安装的浏览器路径。
在 Ubuntu 上,你可以使用以下命令安装 Chromium:
# 安装 Chromium
sudo apt install chromium-browser
使用 Snap 安装 chromium-browser
对于 Ubuntu 20.04 及以上版本,chromium-browser 包会通过 Snap 自动安装。
检查是否安装了 Snap
通常 Snap 是预装的,但可以运行以下命令确认:
snap --version如果 Snap 未安装,可以手动安装:
bash


复制代码
sudo apt install snapd -y
安装 Chromium
使用 Snap 安装
chromium-browser:sudo snap install chromium这个命令会下载并安装最新的 Chromium Snap 包。
验证安装
安装完成后,可以运行以下命令确认安装成功:
chromium --version
配置 Puppeteer 使用 Snap 版 Chromium
在使用 puppeteer 或 puppeteer-core 时,如果希望它使用 Snap 安装的 Chromium,需要指定 Snap 安装的可执行文件路径:
javascript复制代码const browser = await puppeteer.launch({
    headless: true,
    executablePath: '/snap/bin/chromium'  // Snap 版 Chromium 的路径
});
3. 创建 Node.js 项目并安装 Puppeteer
在服务器上创建一个新目录,并初始化一个 Node.js 项目。
# 创建项目目录
mkdir puppeteer-project
cd puppeteer-project

# 初始化 npm 项目
npm init -y

# 安装 puppeteer-core
npm install puppeteer-core
4. 在root下运行
puppeteer 在 root 用户权限下运行时,需要 --no-sandbox 选项,否则无法正常启动浏览器。可以通过添加此选项来解决问题。请按照以下步骤更新您的代码:
解决方法:添加 --no-sandbox 选项
在 HTML2IMG.js 文件的 puppeteer.launch 配置中,添加 args: ['--no-sandbox']:
const browser = await puppeteer.launch({
    headless: true,
    executablePath: '/snap/bin/chromium',  // 根据您的安装路径
    args: ['--no-sandbox']                  // 添加此选项
});
四、服务器运行脚本
1. 脚本
创建一个文件 htmlToImage.js,确保路径正确,并且在服务器环境下执行。
const express = require('express');
const puppeteer = require('puppeteer-core');
const fs = require('fs');
const path = require('path');

const app = express();
const port = 3000;

// 解析 JSON 请求体
app.use(express.json());

// HTML 转图片的函数
async function htmlToImage(htmlContent, outputFilePath) {
    const browser = await puppeteer.launch({
        headless: true,
        executablePath: '/usr/bin/chromium-browser'  // 替换为服务器上的 Chromium 路径
    });
    const page = await browser.newPage();
    await page.setContent(htmlContent);
    await page.screenshot({
        path: outputFilePath,
        fullPage: true
    });
    await browser.close();
}

// 定义接收 HTML 内容的接口
app.post('/convert', async (req, res) => {
    const htmlContent = req.body.htmlContent;
    const outputFilePath = path.join(__dirname, 'output_image.png');  // 图片保存的路径

    try {
        await htmlToImage(htmlContent, outputFilePath);
        res.sendFile(outputFilePath, (err) => {
            if (err) {
                console.error('Error sending the file:', err);
                res.status(500).send('Error sending the file');
            }
        });
    } catch (err) {
        console.error('Error converting HTML to image:', err);
        res.status(500).send('Error generating image');
    }
});

// 启动服务
app.listen(port, () => {
    console.log(`Server is running at http://localhost:${port}`);
});
2. 启动服务
node server.js
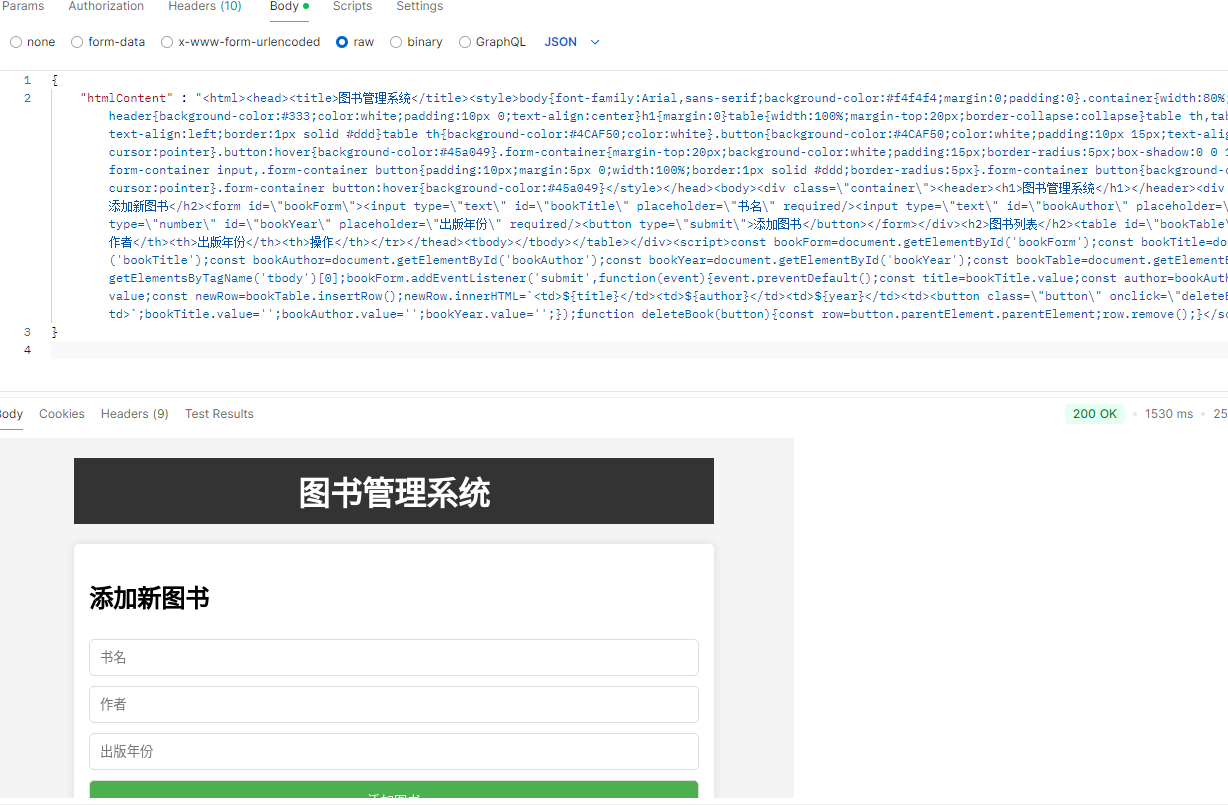
3. 在postman测试
选择 HTTP 方法为
POST。请求 URL:输入你的服务器 URL 和端点,例如:
plaintext


复制代码
http://xx.xx.xxxx.xxx:3000/convert
设置 Headers: 在
Headers选项卡中,添加如下内容:Content-Type:application/json
设置请求体: 在
Body选项卡中,选择raw,并确保选择JSON格式。在文本框中输入 JSON 数据,格式如下:json复制代码{ "htmlContent": "<html><body><h1>Hello World</h1></body></html>" }这里的
htmlContent是你希望转换为图片的 HTML 内容。发送请求: 单击
Send按钮,发送请求到服务器。
4 .安装中文字体
步骤 1: 安装中文字体(Linux 环境)
如果你在 Ubuntu 或其他 Linux 系统上运行,可能需要安装字体支持:
sudo apt-get update
sudo apt-get install -y ttf-mscorefonts-installer fonts-noto-cjk
这会安装 Microsoft Core Fonts 和 Noto CJK 字体,这些字体可以帮助 Chromium 显示中文。
步骤 2: 通过 args 配置 Puppeteer
可以在 puppeteer.launch() 中加入 args 配置,确保正确的语言环境和字体支持。
const puppeteer = require('puppeteer-core');  // 引入 puppeteer-core

async function htmlToImage(htmlContent, outputFilePath) {
    // 启动浏览器
    const browser = await puppeteer.launch({
        headless: true,  // 无头模式,表示不打开浏览器窗口
        executablePath: '/usr/bin/chromium-browser',  // 在 Ubuntu 上的 Chromium 路径
        args: [
            '--no-sandbox',
            '--disable-setuid-sandbox',
            '--lang=zh-CN'  // 强制使用中文环境
        ]
    });

    // 创建新的页面
    const page = await browser.newPage();

    // 设置页面内容为传入的 HTML
    await page.setContent(htmlContent);

    // 截图并保存为 PNG 文件
    await page.screenshot({
        path: outputFilePath,  // 输出路径
        fullPage: true,  // 截图整个页面(包括滚动区域)
    });

    // 关闭浏览器
    await browser.close();
}

// 导出方法,方便调用
module.exports = htmlToImage;
五、在Java中调用脚本
package com.dawn.ruanzhupro;

import org.springframework.boot.test.context.SpringBootTest;
import java.io.*;
import java.net.HttpURLConnection;
import java.net.URL;
import java.nio.charset.StandardCharsets;

@SpringBootTest
public class HTML2ImgTest {

    public static void main(String[] args) {
//        // 指定 HTML 文件路径
//        String filePath = "D:\\test\\java\\com\\dawn\\ruanzhupro\\test.html";  // 请替换为你的 HTML 文件路径
//
//        // 读取 HTML 文件内容到 htmlContent 变量
//        String htmlContent = readHtmlFile(filePath);
        // 指定 HTML 文件路径
        String filePath = "D:\\Codexxxxxxxx\\src\\test\\javaxxxx\\test.html";  // 请替换为你的 HTML 文件路径

        // 读取 HTML 文件内容到 htmlContent 变量
        String htmlContent = readHtmlFile(filePath);

        String apiUrl = "http://xx.xx.xx.xx:3000/convert";  // Node.js 服务地址

        // 转义 HTML 内容
        String escapedHtmlContent = escapeHtmlForJson(htmlContent);

        // 构建 JSON 字符串
        String jsonInputString = "{\"htmlContent\": \"" + escapedHtmlContent + "\"}";

        System.out.println("请求的 JSON 数据:");
        System.out.println(jsonInputString);  // 打印出实际发送的 JSON 数据,确保格式正确

        try {
            // 创建 URL 对象
            URL url = new URL(apiUrl);

            // 打开连接
            HttpURLConnection connection = (HttpURLConnection) url.openConnection();
            connection.setRequestMethod("POST");
            connection.setRequestProperty("Content-Type", "application/json");
            connection.setDoOutput(true);

            // 发送请求数据
            try (OutputStream os = connection.getOutputStream()) {
                byte[] input = jsonInputString.getBytes("utf-8");
                os.write(input, 0, input.length);
            }

            // 获取响应
            int status = connection.getResponseCode();
            if (status == HttpURLConnection.HTTP_OK) {
                System.out.println("HTML 转换为图片成功!");
                InputStream inputStream = connection.getInputStream();
                FileOutputStream outputStream = new FileOutputStream("output_image.png");
                byte[] buffer = new byte[1024];
                int bytesRead;
                while ((bytesRead = inputStream.read(buffer)) != -1) {
                    outputStream.write(buffer, 0, bytesRead);
                }
                inputStream.close();
                outputStream.close();
                System.out.println("图片已保存为 output_image.png");
            } else {
                System.out.println("请求失败,状态码:" + status);
            }
        } catch (IOException e) {
            e.printStackTrace();
        }
    }

    // 读取 HTML 文件内容
    public static String readHtmlFile(String filePath) {
        StringBuilder content = new StringBuilder();

        try (BufferedReader reader = new BufferedReader(new FileReader(filePath, StandardCharsets.UTF_8))) {
            String line;
            while ((line = reader.readLine()) != null) {
                content.append(line).append("\n");  // 逐行读取文件内容
            }
        } catch (IOException e) {
            e.printStackTrace();
            return null;
        }

        return content.toString();
    }

    // 转义 HTML 内容为 JSON 格式
    public static String escapeHtmlForJson(String html) {
        return html.replace("\"", "\\\"").replace("\n", "\\n").replace("\r", "").replace("\t", ""); // 去除换行符和转义字符
    }
}